Tuesday, April 24, 2012

WEEDING

If you look closely you will see that the dandelion greens are sprouting up everywhere, including in my perennial fruit and vegetable garden.  The whole bed needs to be weeded, and what better way to begin than by harvesting the dandelion greens for supper?  Eating dandelions may seem foreign to many people, but not me.  Growing up in a Greek family means you eat wild dandelion greens every spring.  I have vivid memories of my mother and cousin foraging for dandelions when I was a child, and then serving them for dinner.  They are definitely an acquired taste, and luckily I have that.  The bitterness of the dandelion is a powerful spring tonic for your digestive system, stimulating your liver to detoxify.  Which is a really good thing after a long winter of heavy foods.
I remembered to grab my camera on my way out the door yesterday morning so I could show you how I harvest spring dandelion greens.  When you are ready to try this yourself, just be sure you pick them in clean and unpolluted areas.  That means no digging for dandelion on the side of the road!  As tempting as that may be, it is a really bad idea.  Which is too bad because dandelions love to grow on the gravelly soft shoulders of roads.

GREEK BOILED DANDELION

If you are ever driving around on a nice spring day and see a woman bent over in a field with a plastic bag in one hand and a knife in the other, odds are it's a Greek woman picking dandelions for supper.

 3 lbs young wild dandelion greens
1 Tbsp sea salt
about 2 Tbsp extra virgin Greek olive oil
the juice of about 1 organic lemon
sea salt and pepper to taste

Method:  Wash the greens well before cooking and trim any coarse stems.   Discard any brown leaves.  Soak the dandelion in a clean sink with plenty of water.  Any sand or debris will eventually sink to the bottom while the greens float on the surface of the water.  Remove the greens from the water and place in a colander to dry.

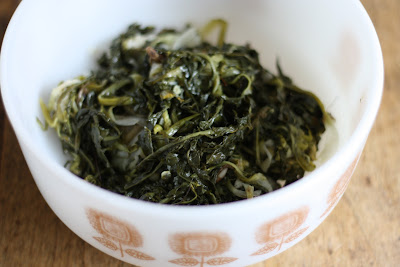
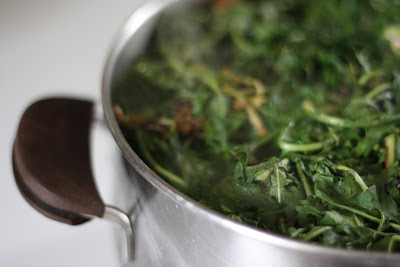
Bring a large pot of water to boil and add the salt.  Carefully submerge the greens in the pot and boil gently for about 20 minutes or until the thickest parts of the stems are tender.  Do not overcook.  Drain the greens well in a colander over the sink.  Really squeeze the liquid out with the back of a spoon.  Place greens in a bowl and drizzle with olive oil, lemon, salt and pepper.  Serve warm or at room temperature.

Wednesday, April 18, 2012

OUT WITH THE OLD

...to make room for the new!  Little by little I've been clearing out the preserves from last summer (and the summer before) from our pantry and freezer.  It seemed odd to buy fresh, new kale (although I did anyway) when I still had jars of it in the freezer.  I also spied quite a few bottles of pesto that we hadn't managed to consume all winter.  Needless to say, we've been eating pesto in everything from scrambled eggs to salad dressing.  Speaking of salad dressing, I can't tell you how good a couple of spoonfuls of pesto tastes in a vinaigrette.  So good that I was wiping my plate clean of this dressing with bits of roasted duck at dinner last night.  We've been loving the fresh spinach available at the Farmer's Market these last few weeks, which tonight I paired with pickled beets from our garden and root cellar carrots.  Real, spring, salad.
PESTO VINAIGRETTE

1 1/2 Tbsp organic dijon mustard
2 Tbsp local honey
1/4 cup organic red wine vinegar
2 Tbsp organic balsamic vinegar
1/2 tsp sea salt
ground organic black pepper
1/2 cup organic local flax seed oil
1/2 cup organic extra virgin olive oil


Method:  Combine all ingredients except oils in a blender and blend.  Slowly drizzle in the oils with motor running until thick and creamy.  Refrigerate up to 3 days.

Monday, April 16, 2012

KIDDING AROUND

So fun to wake up this morning, look out Faegan's bedroom window into the backyard and see Scott still home and striding across the lawn.  Hooray!  he was so happy to announce that our sweet goat Cassie had given birth to two kids.  
What an exciting moment for our family, this being the first birth we've experienced as new farmers.  Not only are we blessed with two very cute little kids, we will soon be in the milk as well which is great because I miss having access to organic, raw milk.  Guess I better brush up on my milking skills, and my enthusiasm for this daily task.
   Before I keep gushing about his wonderful event, I must fill you in on the circumstances which led to this joyous occasion.
     So our little brood of goats arrived at Spruce Hill Farm way back last spring as a threesome, Cassie and her two kids whom we named Buck and Nola.  Now Buck was the male and he was still a youngster, but we knew we had to keep an eye on him as he matured so that he wouldn't try and mate with his mommy or sister.  Time passed and so eventually did Buck.  As late winter rolled around we made arrangements with a local farmer to have our Cassie date her buck for a little while in hopes of getting her pregnant.  Time passed there as well and no luck hooking those two goats up no matter how long we left her there!  So, we disappointedly brought Cassie home, only to discover that she was already pregnant, very pregnant too.  Looks like Buck left a little of himself behind...
     Apparently this is deemed a "terminal cross" which isn't a problem genetically unless it unexpectedly happens again within the family.  Which could very well happen because I think we have two new boys in the family.

Sunday, April 15, 2012

SWISS APPLE PANCAKES

I've never been to Switzerland, so I really have no history or information behind this delicious pancake recipe other than that I adapted it from The Swiss Cookbook by Nika Standen Hazelton.  This is the only recipe I've ever made from it,  so I am really not prepared to make any recommendations, but how can a book with a photo of a pile of Toblerone bars on it be bad?
I've made this recipe many times, usually on Sunday mornings when I am in the mood for something different.  I've always followed the recipe directions and made one giant apple pancake which then gets cut into wedges and served hot with maple syrup.  It's a nice idea, but very impractical because it is extremely difficult to flip a huge apple laden pancake over neatly.  So this morning I managed to be innovative and make mini (or rather, normal size) pancakes using my two smaller cast iron pans.  The trick is to use a conservative amount of batter so the top isn't too runny when it's time to flip it.  Success!  and the pancakes brown nice and evenly instead of the usual burned patches in the centre that I get when make the giganticos.  My version is wheat free, contains less sugar and the flour is soaked overnight in buttermilk.  Breakfast goodness.
SWISS APPLE PANCAKES

2 cup organic whole spelt flour
1 cup organic light spelt flour
1 1/3 cups organic buttermilk
1 tsp sea salt
4 organic eggs, well beaten
3 Tbsp coconut sugar
1 tsp ground organic cinnamon
2/3 cup organic apple juice (I used freshly juiced)
3-4 organic apples (I used cortlands), peeled, cored and sliced thinly
1/4 cup organic butter

Method:  The night before you want to make these pancakes, combine the flour and buttermilk in a bowl and stir until all the flour is moistened.  Allow to rest overnight on the counter.
     The next morning, add the eggs, sugar, cinnamon, and apple juice.  Whisk until smooth.  Melt some of the butter in a small cast iron skillet.  Pour the batter into the skillet so that it coats the bottom of the pan in a 1-2 cm layer.  Top with the apple slices.

  Fry until golden brown.  Flip and brown the other side.  Serve hot with maple syrup or I've even heard of them being served with sour cream and currant jelly.  Yum.  Repeat with remaining batter. 

Tuesday, April 10, 2012

FABULOUS FISH SAUCE


I am not sure why, but this year I am really impatient for the fresh vegetables to be available locally.  So much so that I've been cheating and buying stuff like asparagus, cilatnro, and dandelion greens from faraway places. I've also been buying pineapple and oranges!  I think it has something to do with the fact that we are eating way more vegetables and fruit now that we've reduced the amount of grains, pastas and breads we are eating with every meal, and I am getting tired of eating coleslaw and carrots.  And you know how good a bunch of asparagus tastes with a piece of fish, or how your body craves the bitterness of dandelion at this time of year.  The only sad part is that now when the local stuff comes out, it won't be as special or exciting.  Oh, who am I kidding, it will be very special still.  
     To make our two to three times weekly fish eating experience more exciting, I tried out a new sauce the other night, which I adapted slightly from a cookbook that has been sitting on my shelf for some time.  It's called Grilling Genius, and the two recipes I've tried out so far have been great, so I'm thinking, hey, maybe he is a genius.  Both Scott and I were blown away by the awesomeness of this sauce, and I think it would taste great on shrimp, scallops, and even chicken.  Our son Faegan wasn't so keen on it though, he kept scraping off the "green stuff".  Sigh.
HALIBUT WITH INTENSE CILANTRO GLAZE
(adapted form Grilling Genius by Scott Givot)

3 sustainably harvested Halibut steaks
1/2 Tbsp organic sesame oil (raw)
1/2 Tbsp organic toasted sesame oil
1 Tbsp fish sauce
1 Tbsp organic brown rice vinegar
1 Tbsp wheat free organic tamari
1 tsp organic coconut sugar
1/2 cup organic cilantro leaves
3 cloves organic garlic
1 organic red chili pepper, seeded (optional)
1 tsp sea salt

Method:  Rinse the fish and dry with a paper towel.  Blend the oils, fish sauce, vinegar, and tamari.  Add the sugar, cilantro, garlic, chili, and salt and blend again.  Pour the paste over the halibut and make sure the fish is completely coated.  Cover the dish and marinate in the fridge for 1 hour.  Turn the fish halfway through.
     Remove the fish from fridge 15 minutes before cooking.  Lift the fish from the glaze and cook on a well oiled ot grill for 6 mintues on each side, or broil in the oven for about 15 minutes.  Brush the remaining glaze over the cooked tops when turning fish.  

Saturday, April 7, 2012

ULTIMATE CARROT CAKE

Carrot cake is definitely one of my all time favorite cakes.  I like it so much I even made it for my wedding.  So, as you can imagine, I was pretty glad my son chose it as the cake he wanted for his fourth birthday this year.  Scott was disappointed when the chocolate cake initially chosen was suddenly changed to carrot.  No, I did not coerce or bribe him to pick it (although Scott thinks I did.)  Don't worry Scott, I promise to make you chocolate cake for your birthday!  
I thought I would do things a little differently to my awesome carrot cake recipe in an attempt to make it even more awesome.  The night before baking day, I mixed the buttermilk and spelt flour so the enzymes in the milk could begin to predigest the grain, making it healthier and easier for us to digest.  Now I have to admit, I was apprehensive because I wasn't sure how it would turn out and I didn't want to have to make it twice.  Now I know you are all sitting on the edge of your seats, wondering how it went.  Well, it was fantastic!  I mean, really good.  Like, I ate 4 pieces good.
ULTIMATE CARROT CAKE

1 cup organic light spelt flour
1 1/2 cups organic whole spelt flour
1 cup organic buttermilk
1/2 Tbsp baking soda
1/2 tsp sea salt
3 organic eggs
1/2 cup organic sunflower oil
1/2 cup local maple syrup
2 tsp organic pure vanilla extract
3/4 cup organic crushed pineapple, drained really well
2 cups shredded organic carrot
3/4 cup organic unsweetened shredded coconut
1 cup chopped organic walnuts (optional)

Method:  Combine the flour and buttermilk in a bowl and stir to combine well.  Cover with a lid and let sit at room temperature overnight or for at least 12 hours.
     The next day, preheat oven to 350* and butter 2 round baking pans or one rectangular one and then line with parchment paper.  In a bowl, whisk to combine the eggs, oil, maple syrup, vanilla, baking soda, cinnamon and sea salt.  Pour into the bowl of the soaked flour and using the paddle attachment on your mixer, stir until well incorporated.  Then by hand, stir in the carrot, coconut, pineapple and walnuts.  Pour the batter into the pans and bake for about an hour or until a tester inserted in the centre comes out clean.  Let cool in pans for 10 minutes, then remove and allow to cool.  Frost and serve.
MAPLE CREAM CHEESE ICING

1/2 cup unsalted butter, room temperature
250 g organic cream cheese, room temperature
1/4 cup local maple syrup
1 tsp pure organic vanilla extract

Method:  Cream the butter and cream cheese together.  Then add the maple syrup and vanilla, beat until creamy.  Ice on a cooled cake.