Wednesday, May 25, 2011

NEW ADDITIONS

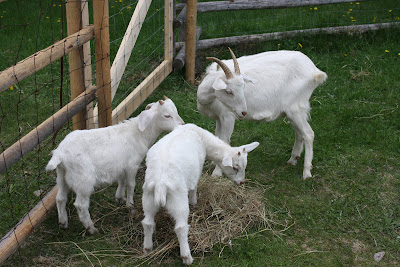
     We are so delighted to welcome the newest members of our family - a nanny goat and her two kids.  They have yet to be named.  The day was so full of activity; driving to Angelhoeve Organic Farm in the valley to pick them up, and of course trying to learn as much as we could about caring for goats in the short time we were there.  Once we've settled into a more familiar routine and get to know the goats better, I am sure the perfect names will naturally arise.  We aren't sure how our son will react to his little friends suddenly "disappearing" one day, so are debating whether or not it is a good idea to name the male kid.  Male goats are aggressive, and well, really only useful as sperm donors, soooooooo he probably won't be frolicking in our fields for too long.
     Needless to say, we are all very excited to have these lovely animals around.  I am a little overwhelmed and worry that we are too inexperienced.  I really want to make sure we take care of them properly so that they thrive and live happily.  I am sure they will, yet I can't help but wonder how it will all turn out.  There is also the whole experience of learning to milk her, while keeping the process sterile and clean so we don't consume tainted milk!  EEEEEK....it's one thing to romanticize keeping goats, and another to actually have the animals in your care.

     Once we master the milking thing, you know I am going to be all over the cheese making process.  I am very thrilled to have our own dairy goats to provide us with milk.  So long Superstore, you won't be seeing me much anymore.  Seriously, I pretty much only went there to buy dairy products.  Plastic wrapped, pasteurized, very non local organic dairy products.  I look forward to reducing our family's plastic pollution even more now that we have goats.  Tomorrow will be my first day home alone with the goats, and it is my job to let them out into the back yard and put out some hay and dairy ration - with two kids in tow (my two kids that is!).  Wish me luck!  I hope she doesn't jump the fence!
Our nanny goat in the milking stand at Angelhoeve getting her nails trimmed before she says goodbye.
The HUGE pig at the farm, getting a little scratch on the head.
Our little farmer boy, getting ready to load the goats into the trailer (which had no ventilation, so Scott had to drill holes into his poor trailer.  It has also been lovingly urinated in big time!)
Our sweet lovelies eating hay.  I just want to hug them.

Friday, May 20, 2011

LIFE ON THE LAND

Spring is such an exciting time of year.  Each day brings new delightful discoveries on the land.  I am especially enjoying witnessing the asparagus  I planted last year find their way out again.  Although they are not ready to eat this year, already they are looking like the real thing!  I was also pleasantly surprised to locate fiddleheads unfurling all around our land, poking their heads out of the moss.  The garden is being planted, a little more each week, and I can't wait until the seeds we sowed start to sprout.  I love going out each day and checking in on all the gardens to see what's happening!  Life is good.
Some dandelion leaves I picked from our yard.  I made a lovely Dandelion Vinegar with some of the leaves.  The rest we ate in fresh salads or boiled and then drizzled with lemon juice, olive oil, sea salt and pepper.
Our new little chicks in the tanning room.
The new turkeys are catching some rays too.
Lovely fiddleheads abound.
Garlic is one of my favorite things to grow.
Scott's very organized garden markers.
Our new homemade cold frame.
The rhubarb appears to have survived the winter.
As did the strawberry plants.
My delicate currant bush.
Bergamot.
One of my favorite herbs for tea in the summer - Lemon Balm.
Tarragon.
Prolific oregano.
Healing comfrey.
Cute little parsley.
And my lavender came back!

Sweet blessings from the earth.  Happy Spring!


Monday, May 16, 2011

ENOKI ROLLS


As you can probably see, I am still addicted to the Real Women of Philadelphia contest.  But the contest is over now so I can be honest and recommend you actually use goat cheese or organic cream cheese....

Enoki rolls are delicious and elegant appetizers to serve to your guests this spring. Thin slices of prosciutto enclose creamy cheesy creminis, chives, and crunchy enoki mushrooms. A "must try" recipe, you won't be disappointed!
  • Prep time: 10 minutes
  • |
  • Cook time: 5 minutes
  • |
  • Total time: 15 minutes
  • |
  • Servings: 16
  • 2 tbsp. of extra virgin olive oil
  • 1/4 cup(s) of minced shallots
  • 1/2 pound(s) of fresh cremini mushrooms, wiped clean and chopped
  • 1 tbsp. of brandy
  • 2 tsp. of fresh lemon juice
  • 8 ounce(s) of organic goat cheese (chevre) or organic cream cheese, room temperature
  • 2 tbsp. of minced fresh chives
  • 1/2 tsp. of sea salt
  • 1/4 tsp. of freshly ground black pepper
  • 12 slices Italian prosciuotto, each cut into 4 rectangles
  • 1/2 pound(s) of fresh enoki mushrooms
  • 32 2" pieces of fresh chives
Steps
  1. Heat a large skillet over medium heat.
  2. Add the olive oil, shallots, and mushrooms and saute for about 5 minutes, or until the mushrooms are nicely browned and soft.
  3. Add the brandy and lemon juice, and stir until the liquid is absorbed, about a minute.
  4. Remove from heat and spoon into the bowl of a food processor.
  5. Process until the mushrooms are finely chopped. Be sure to use a spatula to scrape down the sided of the bowl.
  6. Blend together the cream cheese and chives with an electric mixer.
  7. Stir in the mushrooms, sea salt, and pepper.
  8. At this point you can refrigerate the mix until you are ready to assemble the rolls, or you can proceed to the next step.
  9. Spread a thin layer of the cream cheese blend onto a piece of the prosciutto. Lay a few of the enoki mushroom on the end closest to you, along with a few chives.
  10. Ensure that the chives and mushrooms stick out on either end for visual appeal, then roll them up tightly in the prosciutto.
  11. Arrange on a serving dish with grated lemon zest and chopped chives around the edge of the plate.

NEW BLOG!

HI EVERYONE.........
Please note - this Blog has moved to a new address.....please check it out and become a fan on Facebook!
http://keepingitreal-naturalhomemaking.blogspot.com/

Friday, May 13, 2011

TYROPITA - Phyllo Cheese Triangles

I am addicted to the Real Women of Philadelphia contest......here is my second submission...


TYROPITA - Greek Phyllo Cheese Triangles

eggs
4 ounce(s) of organic Cream Cheese
1/2 pound(s) of feta cheese
1/4 cup(s) of fresh parsley, finely chopped
3 tbsp. of fresh chives, finely chopped
1/4 tsp. of freshly ground black pepper
1/8 tsp. of fresh grated nutmeg
1/2 pound(s) of whole wheat or regular phyllo
1/2 cup(s) of extra-virgin olive oil
11 ounce(s) of fresh spinach or other salad greens
1 1/2 cup(s) of grated carrot
12 sprigs fresh oregano
12 fresh whole chives
1 cup(s) of extra virgin olive oil
9 tbsp. of fresh lemon juice
3 pinch of sea salt
3 pinch of freshly ground black pepper
4 tbsp. of finely chopped fresh oregano

Method:  Preheat oven to 350* F.  Beat the eggs with a mixer until fluffy.  Add room temperature cream cheese and continue to blend until well incorporated and creamy.  With your hands, crumble in the feta and stir.  Add the fresh parsley, chives, pepper, nutmeg and stir to blend.  
     Place the large phyllo sheets horizontally on your counter, so that the shorter edges are to the right and left.  Cut the phyllo sheets, (making vertical cuts) in strips, about 3 1/2" wide with a very sharp knife.  Stack them on top of each other and cover with wax paper, and then a clean kitchen towel to prevent them from drying out.  Using a clean pastry brush,  brush each strip with olive oil.  Then place 1 heaping tsp of cheese mixture at one end of each strip.   Lift a corner of the strip next to the filling and fold it over the filling so that it touches the opposite long side and forms a triangle enclosing the filling. Continue to fold up the pastry, maintaining the triangular shape. Fill and fold remaining strips.  Place the triangles on a greased baking sheet, and lightly brush each triangle with some olive oil.  Bake in the preheated oven until golden brown, about 20-25 minutes.
     In a small bowl make the salad dressing by whisking together the 1 cup of olive oil, lemon juice, the 4 Tbsp chopped oregano, sea salt, and pepper.  To plate: Place a handful of fresh spinach on a serving plate. Sprinkle with some grated carrot. Drizzle with some salad dressing, top with 2-3 cheese triangles, and then garnish with a sprig of oregano and a chive. Enjoy!

Sunday, May 8, 2011

MAPLE APPLE TART

I just entered my famous Maple Apple Tart recipe and demonstration video into the Real Women of Philadelphia contest for a chance to win $20 000!  Wish me luck!


MAPLE APPLE TART
It's spring and the maple sap is running!  Nova Scotia has many local producers of maple syrup, but this year my husband I decided to try our hand at making some from the maple trees on our property.  Wow! I have a whole new respect for maple syrup after that experience.  Did you know you need 40 litres of sap to make 1 litre of syrup?  It's Canada's liquid gold!  I wanted to create a recipe for this contest using what was available at the Farmer's Market at this time of year.  We filmed on May Day in Halifax, and the rhubarb and berries still weren't ready, but apples are still around, and there was lots of fresh maple syrup for sale.  I used to sell homemade baked goods at the Halifax Farmer's Market, and this Maple Apple Tart was a huge hit, so I've decided to share the recipe with all of you.  Hope you enjoy!

MAPLE APPLE TART

Crust:
1/2 cup unsalted organic butter, room temperature
1/3 cup pure local maple syrup
1 cup organic unbleached all purpose flour
1/2 cup organic whole wheat flour

Cream Cheese Filling:
10 oz original organic cream cheese, room temperature
1/4 cup pure maple syrup
1 organic egg
1 tsp pure organic vanilla extract

Apple Topping:
2 large organic apples, (Cortland or Spy) peeled and cored
2 Tbsp pure local maple syrup
1/2 tsp ground organic cinnamon
1/4 cup sliced almonds

Method:
Crust - Preheat oven to 450* F. Cream butter until light and fluffy. Drizzle in the maple syrup and continue to mix until well combined. Stir in the two flours until well blended. If it is still wet, you can add a little bit more flour. Press into the base of a 9" round springform pan or tart pan with a removable base to make an even layer. Create a 1" inch edge that presses against the sides of the pan. Set aside while you make the filling.

Cream Cheese Filling - Put cream cheese into the bowl of an electric mixer fitted with the paddle attachment; mix on medium-low speed until creamy, about 2 minutes. Scrape down sides of bowl, then gradually add the maple syrup. Scrape down sides of bowl; add the egg and mix well. Scrape down sides of bowl, and mix in vanilla extract and mix until very creamy and no lumps remain, about 2 minutes. Pour the filling into the prepared crust, and use a spatula to spread the filling evenly over the crust. Set aside while you make the topping.

Apple Topping -  Peel and core apples and cut them into thin slices. In a large bowl, shake the apples with the cinnamon and maple syrup until the apples are coated well. Arrange the apple slices, pinwheel fashion over the cheese filling. Sprinkle the almonds over the apples. Bake in a the preheated oven for 10 minutes, then reduce the heat to 400*F and bake for another 25 minutes until the filling has set. Cool to room temperature and chill 3-4 hours before serving.

Tuesday, May 3, 2011

GROWING MICRO GREENS

If you like sprouting, you're gonna love growing micro greens.  They are basically just "grown up" sprouts that have been propagated in soil instead of just water.  They are very easy as to grow and will definitely make you feel like you're a super kitchen whiz.  They make great additions to salads and sandwiches, and they also make pretty snazzy garnishes too.  
     Microgreens are plants sprouted from seeds that are grown in soil and have at least two true leaves after the cotyledons appear.  The difference between sprouts and greens is that sprouts are eaten root and all, whereas only the leaves and stems of micrgreens are harvested for consumption.  They are larger than sprouts, yet smaller than the popular commercially grown baby salad greens. 

WHAT TO GROW:
Amaranth
Arugula
Basil
Beet- (pre-soak)
Broccoli
Cabbage
Chives
Red Clover
Corn – (pre-soak)
Cress
Fennel- (pre-soak)
Fenugreek
Flax
Kale
Mizuna
Mustard
Parsley- (pre-soak)
Peas- (pre-soak)
Radish
Wheatgrass- (pre-soak)
Method:
1. Pre-soak the seeds: Some larger seeds need to be pre-soaked before sowing.  Place them in warm water for 24 hours before planting.
2. Growing medium:  Fill a wide, shallow tray or pot with organic potting soil.  Be sure to plant in a container that has drainage to prevent mould and rot.  A lovely, plastic free option is an Asian bamboo steamer.  Spread the seeds evenly over the moistened soil, lightly press to settle the seeds, and then cover the tray with a moistened dish cloth.  Store the tray in low light at room temperature.  Water lightly every morning until the greens germinate.
3. Sun your plants:  Uncover the tray and move the tray to a well-lit area out of direct sunlight.  They should be ready in a few days, when they are 2-5 cm tall and 7-1 days old.
4. Harvest: use scissors to cut the greens just above the soil level. It is best to harvest the greens as you need them.  If you must, store harvested greens in the refrigerator in a glass jar.