Tuesday, August 30, 2011

MILKING IT

If you are anything like I was a few months ago, you probably have no idea how to milk a goat.  Well, if you happen to be interested in this sort of thing, this video is for you.......

And don't forget about the Keeping It Real Contest!
I want to remind existing Facebook fans that you too can enter the contest!  Just leave a comment on this page that says you are a facebook fan......or let your friends know about the contest and leave a comment telling me that you did!  Good luck!


THE KEEPING IT REAL BOOK GIVEAWAY!

I am very pleased to announce this blog's very first contest!  One lucky winner will win any three books of their choosing from the amazing selection in the Keeping It Real Bookshop. The contest is open to residents of Canada and the United States. Here’s what you have to do:

Subscribe to the Keeping It Real blog. This is the only must do in the giveaway. 
After you confirm your subscription, leave a comment on this page that says, “I subscribe to the blog.”
If you already subscribe, just leave a comment that says so.
Bonus Entries
There are additional ways to enter for more chances to win. You can do as many or as few as you like:
1. Become a fan of our Keeping it Real page on Facebook. 
Please leave a comment on the wall and you will be entered into the contest.
Click the “Like” button, then leave a message on this page that says, “I Like you on Facebook.”
If you already subscribe to the Facebook page you can leave a comment and say so.
2. Post this contest on Facebook.
Grab this link: http://keepingitreal-naturalhomemaking.blogspot.com/2011/08/keeping-it-real-book-giveaway.html
Attach it as a link to a status update on Facebook
Then leave a message on this page that says, “I Facebooked it.”

A FEW RULES

YOU MUST LEAVE A COMMENT IN ORDER TO HAVE AN ENTRY

YOU MUST LEAVE A SEPARATE COMMENT FOR EACH ENTRY.

YOU MUST FULFILL THE RULES OF EACH ENTRY FOR EACH ENTRY TO COUNT. IF YOUR ENTRY DOESN’T MEET THE REQUIREMENTS, WE’LL REMOVE IT.

WINNER WILL BE SELECTED AT RANDOM.

GIVEAWAY IS OPEN TO READERS IN THE UNITED STATES & CANADA ONLY.


This giveaway will close on September 25th 2011 at 8 pm. Winner to be chosen by random generator. Winner to be announced on September 26 2011. Good Luck!

Thursday, August 25, 2011

THE KEEPING IT REAL BOOK GIVEAWAY!

I am very pleased to announce this blog's very first contest!  One lucky winner will win any three books of their choosing from the amazing selection in the Keeping It Real Bookshop. The contest is open to residents of Canada and the United States. Here’s what you have to do:

Subscribe to the Keeping It Real blog. This is the only must do in the giveaway. 
After you confirm your subscription, leave a comment on this page that says, “I subscribe to the blog.”
If you already subscribe, just leave a comment that says so.
Bonus Entries
There are additional ways to enter for more chances to win. You can do as many or as few as you like:
1. Become a fan of our Keeping it Real page on Facebook. 
Please leave a comment on the wall and you will be entered into the contest.
Click the “Like” button, then leave a message on this page that says, “I Like you on Facebook.”
If you already subscribe to the Facebook page you can leave a comment and say so.
2. Post this contest on Facebook.
Grab this link: http://keepingitreal-naturalhomemaking.blogspot.com/2011/08/keeping-it-real-book-giveaway.html
Attach it as a link to a status update on Facebook
Then leave a message on this page that says, “I Facebooked it.”

A Few Rules

You must leave a comment in order to have an entry

You must leave a separate comment for each entry.

You must fulfill the rules of each entry for each entry to count. If your entry doesn’t meet the requirements, we’ll remove it.

Winner will be selected at random.

Giveaway is open to readers in the United States & Canada only.

This giveaway will close on September 25th 2011 at 8 pm. Winner to be chosen by random generator. Winner to be announced on September 26 2011. Good Luck!

IT MUST BE SUMMER.....another way with Chard

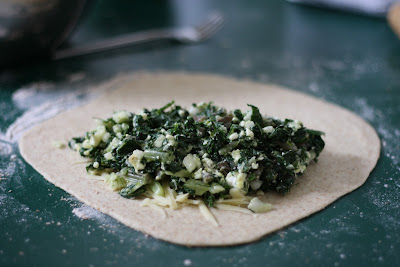
I had grand plans to make spanakotiropita with some of the chard that keeps growing in our garden.  It's so great that we have more than enough to eat now while it is fresh, and plenty to prepare and freeze for the winter.  I thought this recipe was the perfect opportunity to use of one of the many packages of phyllo in my freezer than need to disappear.   I don't know what happened though.  When I opened the pack I had defrosted it was all stuck together and pretty useless so I tossed it out and had to come up with a plan, quick.  I had already prepared the chard and feta filling and had a house full of people expecting dinner at some point.  Then it hit me, CALZONES!  Yes.....so I whipped up a batch of pizza dough, grated some mozzarella cheese, and dinner was on it's way.


Rather than repeat myself, feel free to check out the recipes for Spanakotiropita and Pizza Dough on my blog.

BABY'S FIRST MEAL

Our family celebrated a milestone in baby Jude's life yesterday with a special ceremony to introduce him to his first taste of food.  I was determined to make this meal extra special by making a puree from food grown from our very own garden.  I know bananas, avocado, mangoes, and other yummy vegetables and fruits make for great baby foods, but it seems so wrong to feed him food grown in the tropics.  After some contemplation, I took a stroll into the garden and pulled up some nice looking carrots and headed into the kitchen.  I am loving my Vita Mix blender even more after spending the afternoon making baby food with it.  It liquifies anything in seconds.  While I was at it I decided to make broccoli and string bean puree as well. I piled up three levels of my asian bamboo steamer and then made enough food to freeze so when I am really harried and in need of food fast I'll have some on hand.
     The table was set with a food altar, symbols and samples of the wonderful foods that will nourish and sustain him throughout his life.  There was some bread and sea salt.  A new season apple.  A dish of olives and oil my father brought for us from his village in Greece.  A whole carrot fresh from the soil.  
The candle was lit and we gathered around.  I said a few words for my son.  Words spoken in hopes that he will never know hunger, and praying he will always honour the earth that sustains him.  


We love you little one, bon appetit.

Saturday, August 20, 2011

RUSTIC RHUBARB TARTS with Lemon Cream Cheese

So the Real Women of Philadelphia contest is long over, but I don't think I posted my recipe entry for Rustic Rhubarb Tarts.  I still have lots of rhubarb growing in my garden and I am guessing I am probably not the only one.  I apologize for the dorky videos I made demonstrating me making all kinds of stuff with Philly.  I am not really into Philadelphia cream cheese at all.  I never buy the stuff, and in fact don't recommend you do either.  I just really wanted to win $10 000.  Considering Anna Olsen was the judge, I figured my best bet was to go all conservative too.  So, if you like the recipes I submitted to the contest, do me a favour and substitute some nice organic cream cheese, or, when appropriate, creamy goat cheese (chevre).  That is what I actually use in my kitchen.  I am really looking forward to filming some great footage of "things we do around my place" in the near future.  I learned alot filming these little suckers, and can't wait to refine my skills in the fine art of video blogging..


RUSTIC RHUBARB TARTS

1 pound organic rhubarb
1/3 cup local maple syrup, or more to taste
1/2 cup organic whole wheat flour
1/2 cup organic unbleached white flour
1/2 cup organic rolled oats
1 tsp sea salt
1/2 cup organic unsalted butter, chilled
3 oz organic cream cheese, chilled
1 organic egg yolk
2 tsp organic lemon zest
2 Tbsp local maple syrup
5 oz organic cream cheese, room temperature


Make the pastry dough: Place the flours, oats, and sea salt in the bowl of a food processor, and pulse to combine.  Add 1 egg yolk, 3 oz cold Cream Cheese, 1/2 cup cold unsalted butter, and process until the dough comes together, about 15 seconds.  
Pour the dough out onto your counter and form it into 6 equal balls.  Flatten each disc with the palm of your hand and place them in a covered container in the refrigerator and chill while you make the other components of the recipe.  
Make the rhubarb compote: Chop the rhubarb into small pieces.  Place them in a medium sized saucepan with the maple syrup and bring to a boil.  Reduce the heat and simmer until the mixture thickens to a thin jam like consistency.  Remove from heat and allow to cool. 
 Make the cream cheese filling: Place the 5 oz of room temperature cream cheese in the bowl of your mixer along with the maple syrup and lemon zest; mix until light and creamy.  
Roll out the dough: Remove the dough from the fridge and place a ball onto a lightly floured piece of parchment paper.  With a rolling pin, roll the dough out into a small circle that is 1/4" thick.  Leaving a 1" border, spread 1/6th of the cream cheese onto the dough.  Place a couple of spoonfulls of the rhubarb compote on top of the cream cheese.  Fold the edges of the dough over the filling, using your hands to shape and seal it gently.  Repeat this with the other 5 balls of dough.  Place the tarts onto a parchment lined baking sheet and bake in a preheated 375* oven for 40 minutes. Serve warm or at room temperature.

Saturday, August 13, 2011

FEEL THE RHYTHM OF THE BEET

The beets were bulging out of the ground, and so it was time to pickle.  I've discovered that it only really makes sense to can and preserve when you grow your own produce.  Luckily our beets really didn't mind the cool and wet temperatures of our coastal garden.  I really wish I could say the same for our tomatoes.  I am on the lookout for a good source of organic (or just not poisoned ones, I'm not really that picky) tomatoes for canning this year, and am in the process of negotiating a good deal.  Who knew preserving was such a hustle?  A strawberry farmer in the valley who apparently grows nice unsprayed strawberries wouldn't even let me come for a little u-pick this summer.  She has preferred clientele and basically told me not to bother driving out.  Wow.  I really need some fertile farmland so I can grow all of my own goods.  Geesh.  Anyway, so far our freezer is stocked with leafy greens and rhubarb, and now I have 5 jars of pickled beets.  It's going to be a lean winter.  
PICKLED BEETS

Makes about 6 x 500 ml jars.


10 cups (about 16 large) organic beets, prepared
2 1/2 cups  local organic apple cider vinegar
3 cups  water
¾ cups local honey

Method:  Prepare beets:  Scrub beets, leaving root and 5 cm of stem intact to prevent bleeding. Place beets in a large saucepan; cover with water; bring to a boil; cover and simmer 20 to 40 minutes until beets test tender with fork.  Be sure not to over cook.
Place 6 clean 500 ml mason jars on a rack in a boiling water canner; cover jars with water and heat to a simmer (180°F/82°C). Set screw bands aside; heat SNAP LID sealing discs in hot water, not boiling (180°F/82°C). Keep jars and lids sealing discs hot until ready to use.
Combine the vinegar, water and honey in a stainless steel saucepan. Bring to a boil; cover and reduce heat, keeping solution hot.
Drain beets; rinse with cold water to cool; slip off the skins removing tap root and stems. Quarter beets to yield 14 cups.
If necessary, return pickling liquid to a boil. Pack beets into a hot jar to within 2 cm of top of jar. Add hot pickling liquid to cover beets to within 1 cm of top of jar (headspace). Using nonmetallic utensil, remove air bubbles and adjust headspace, if required, by adding more beets and hot brine. Wipe jar rim removing any food residue. Centre hot sealing disc on clean jar rim. Screw band down until resistance is met, then increase to fingertip tight. Return filled jar to rack in canner. Repeat for remaining beets and hot brine.
When canner is filled, ensure that all jars are covered by at least 2.5 cm of water. Cover canner and bring water to full rolling boil before starting to count processing time. At altitudes up to 1000 ft (305 m), process –boil filled jars – 30 minutes.
When processing time is complete, remove canner lid, wait 5 minutes, then remove jars without tilting and place them upright on a protected work surface. Cool upright, undisturbed 24 hours; DO NOT RETIGHTEN screw bands.
After cooling check jar seals. Sealed discs curve downward and do not move when pressed. Remove screw bands; wipe and dry bands and jars. Store screw bands separately or replace loosely on jars, as desired. Label and store jars in a cool, dark place. For best quality, use home canned foods within one year.

Friday, August 12, 2011

(PHALLIC) FUDGESICLES

Oh my.  The long anticipated purchase of the plastic free stainless steel popsicle moulds has morphed into a purchase gone bad.  Don't get me wrong, they are all that they promised to be in terms of providing a good alternative to plastic kitchen gadgets - well except for the fact that they come wrapped in plastic!  The thing is the design and shape of these popsicle molds are kind of odd, they look like, well, um, very phallic.  I feel so strange feeding these things to my son (and neighbourhood kids for that matter).  I ate one of them today for the first time, and I even felt weird sucking on the thing.  There is good news though - I have developed a recipe for healthier fudgesicles that taste awesome good.  I suppose I could always bring some to the next stagette I attend.....
FUDGESICLES

1/2 an organic avocado
1/2 can organic coconut milk
1 organic banana
1/4-1/2 cup local honey
1/4 cup organic cocoa powder
1/2 cup organic yogurt 
milk, kefir, or almond milk
additives: 2 Tbsp goji berries, 2 tsp bee pollen

Method:  Combine all ingredients a blender and puree until smooth.  Add as much milk as you need to keep the blade moving and to allow you to pour it out of the blender.  You want the blend to be thick, but thin enough to get it out!  Pour into popsicle molds and freeze for at least 6 hours.

Thursday, August 4, 2011

PUTTING IT UP

  One look in my garden today and I knew it was definitely time to start preserving some of this harvest before it was too late.  Like all of us, I have list a mile long of all the things I'd like to do, but some things just can't wait.  So during Jude's third and final nap of the day I headed into the garden and began to harvest chard, spinach and rhubarb.  I gave them all a little rinse and then set a huge pot of water on to boil.  Meanwhile, I chopped up the rhubarb and filled up a Mason jar with it and stuck it in the freezer.  I can't speak highly enough of Mason jars.  We use them for storing all of our food and beverages. 
  The spinach and chard are going to taste great in the dead of winter when not a leafy green is to be found (well except for some kale perhaps).  Into the boiling water went the chopped chard for just a little bit, enough to blanch it, and then bam! (Emeril style) I dunk it into ice water to shock it and help keep it's vibrant green colour.  This too went in the freezer in a Mason jar.  
I cook the spinach in a smaller pot with just a wee bit of water until it is wilted and then plop that into ice water.
 
 So, now I just have to keep this up until all the greens are safely put away for the long, cold winter.....

Wednesday, August 3, 2011

RAINY DAY WELSH CAKES

What better way to spend a rainy day than baking with my kids?  I propped up the wee babe on the counter in his chair (which I know you're not supposed to do, but it seems safe) and the kid on the step ladder and we began to bake.  Actually I started off with Jude in the Mei Tai on my back but he wasn't happy there for very long, so onto the counter he went.  He happily gurgled at us as we began to measure and stir. 
 Every time I bake bread or make cookies, Faegan eats more raw dough than cooked.  

Anyway, today's treat was one of my favorites, Welsh Cakes.  They aren't the prettiest cookie, but they are delicious.  Most recipes call for sprinkling them with sugar before you cook them, but you should all know by now that I don't do that.  I like the subtle sweetness of them so leave out the extra sugar.  The original recipe calls for white sugar, but of course, I tried it once with coconut sugar and was really happy with the results so now I always use it instead.  I even tried making them with honey once but they were a little too moist.  But what exactly are Welsh Cakes?  Well let's see what Wikipedia has to say about that....

Welsh cakes (Welsh: picau ar y maenpice bachcacen gri or teisen radell) are traditional Welsh snacks.
The cakes are also known as bakestones within Wales because they are traditionally cooked on a bakestone (Welsh: maen), a cast iron griddle about 1.5 cm or more thick which is placed on the fire or cooker; on rare ocassions, people may refer to them as griddle scones.
Welsh cakes are made from flour, sultanas, raisins, and/or currants, and may also include such spices as cinnamon and nutmeg. They are roughly circular, a couple of inches (4–6 cm) in diameter and about half an inch (1–1.5 cm) thick.
Welsh cakes are served hot or cold dusted with caster sugar. Unlike scones, they are not usually eaten with an accompaniment, though they are sometimes sold ready split and spread with jam, and they are sometimes buttered. They are often eaten accompanied by a pot of tea.
WELSH CAKES

100 g organic unbleached flour
125 g organic whole wheat flour
75 organic coconut sugar
1/2 tsp aluminum and GMO free baking powder 
pinch sea salt
pinch of organic nutmeg and cinnamon
125 organic unsalted butter
75 g organic currants or raisins
1 organic egg, beaten slightly
about 3 oz organic milk

Method:  Heat a large cast iron skillet over medium low heat.  In a medium mixing bowl, combine the flours, sugar, baking powder, salt and spices.  Rub the butter into the flour until it resembles coarse meal.  Add the raisins and stir.  Combine the egg and milk in a bowl and stir it into the flour until it forms a ball.  If the dough is too wet, add more flour until it is dry enough to roll out on the counter.  Lightly flour the counter and roll the dough out until it is about 1" thick.  Using a circular biscuit cutter, cut the dough into rounds and place in the skillet.  Cook until lightly golden on each side.


After we gorged on Welsh Cakes, I excitedly brushed my teeth with my new plastic free toothbrush that arrived in the mail today.  This is my second attempt at an alternative toothbrush, and I've got to say, I like this one way better than the bone and boar bristle one I have, and the recycled plastic jobbie that makes me gag every time I put it in my mouth.  The whole family got new brushes today!  How exciting.

Monday, August 1, 2011

FIRST HARVEST

 I quietly celebrated Lughnasad today by harvesting garlic, and some of our potatoes and beets for the first time.  Lughnasad is the first of three ancient Celtic harvest celebrations.  In Irish Gaelic, the word for August is lunasa named after the God Lugh who is associated with grain in Celtic mythology.
After an unusually rainy spring, we are relieved to discover the crops are surviving and are nourishing us despite the challenges they have faced.  Digging up potatoes is always such fun because you never know what lies beneath.  Scott managed to grow some very fine potatoes this year.  One plant gave us 9 spuds!  The technique of mounding the soil up the stem of the plant throughout the growing season really does increase the plant's production.    I harvested some nice bulbs of garlic as well, but we also managed to grow some duds as well.  A quarter of the bed was shaded by a tall spruce tree which we neglected to prune.  
The beets and peas are as fine as any I've ever bought at the Farmer's Market, which is a huge relief because I missed the market this Saturday.  It is strange to realize that I don't need to buy much there at this time of year because we have so much growing right in our backyard.  We have been eating salad pretty much every night and hardly even make a dent in the crop.  The chard was desperately calling out to be eaten so I made a chard and mushroom lasagna last night.  It truly was a homegrown meal.  The lasagna was made with a white sauce that I prepared with our very own goat milk.  Luckily we had lots of milk gathering in the fridge from our morning milkings because I also had to make fresh ricotta cheese.  What an easy cheese to make!  I remembered reading about the Barefoot Contessa's recipe for ricotta cheese on Gwynth Paltrow's blog GOOP so I googled it up (recipe here)and had it made in no time - which is good because I don't have much of that these days.......

The braised chard, drained, finely chopped and mixed in with homemade goat cheese ricotta.